Overview of Workflows
This topic provides an overview of workflows and scenarios on managing and administering workflows.
Important: Before you begin using the Workflow Designer, take a moment to review the images and terms below to understand how these terms are used within ChangeGear workflows.
ChangeGear allows for the configuration of advanced workflows, automations, and approval processes tailored for a variety of tasks such as onboarding, compliance verification, procurement, and more.
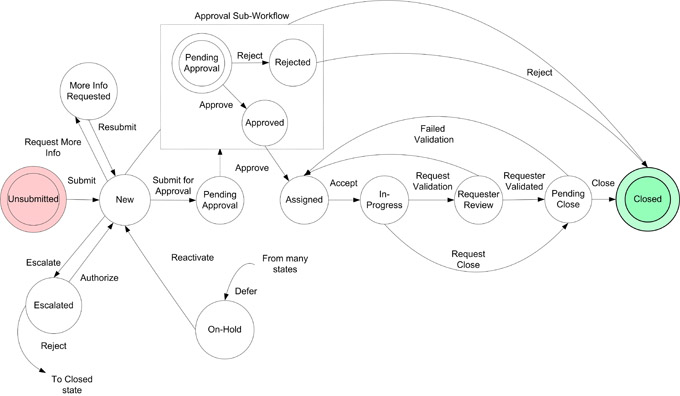
A Workflow is a process systematically organized to complete a goal. It streamlines and automates routine tasks, ensuring efficiency and consistency in execution. Workflows typically involve task allocation, progress tracking, and often incorporate automation tools to facilitate smooth transitions between different stages of a process. The example in Figure 1 depicts a workflow diagram.
ChangeGear ships with a number of pre-built workflows (a.k.a factory workflows) for the various applications or modules to suit different process needs. These workflows are in published status and may not be deleted or edited; however, they can be modified by saving as a new workflow or copying the factory workflow
Figure 1: Workflow Diagram
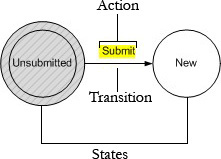
A State is a stage in the behavior of an item or ticket in ChangeGear. States have four types—Start, Process, Approval, and End.
-
A Start state has no incoming connections or states, while an End state has no target connections or outgoing states. In the Figure 2 example below, “Unsubmitted” and “New” are both states. The state “Unsubmitted” is of the type "Start".
-
Process states have both incoming and outgoing/target connections and states.
-
Approval states are a special type of state that must have outgoing states attached to Approve and Reject, and can have approval groups assigned to them.
Actions are the building blocks of a workflow, representing tasks or operations that are performed at certain steps in the workflow. Actions in ChangeGear can trigger automations, which could include sending an email and/or SMS notification, updating a database record, or making announcements. Actions also trigger transitions to move an item or ticket from one state to another. New actions create new privileges that you must enable per role.
Transitions determine the flow between actions within a workflow. They are the connectors that define what happens next after an action is triggered.
Figure 2: State Diagram
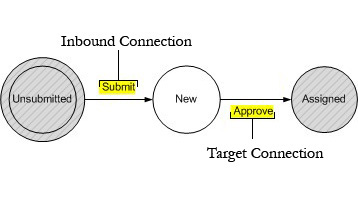
An Inbound Connection is an action that connects to the selected state. In the Figure 3 example below, “Submit” is an inbound connection to the “New” state from the “Unsubmitted” state.
A Target or Outbound Connection is an action available to progress from one state to another state. In the Figure 3 example below, “Approve” is a target connection from the “New” state to the “Assigned” state.
Figure 3: ChangeGear Connections
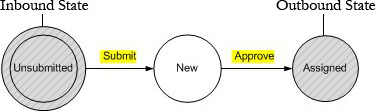
An Inbound State is a state that leads to another state. In the Figure 4 example below, “Unsubmitted” is the inbound state for“New.”
An Outbound State is a state that leads from another state. In the example below, “Assigned” is the outbound state of “New."
Figure 4: ChangeGear States
Workflow Status Bar: The workflow status bar is a graphical representation of the progression through the workflow. Changes made to the workflow may not be apparent in the workflow status bar unless specifically configured to be so.
Figure 5: Actions and the Workflow Status Bar from a Change Management factory workflow.

Building a Workflow
Begin with a factory workflow and tailor it to build your ownby integrating your business processes and automations for tickets, knowledge bases, surveys, and more.
To build a workflow using Workflow Designer:
-
Access Workflow Designer
In Design Studio, click All Apps, or navigate to the desired app (i.e. Change), then select Workflows. The workflows are displayed.
-
Create or modify a workflow
In the Workflow Designer, select an existing workflow to modify. You can either create a copy of the workflow or open the workflow in Design Mode, then save it as a new workflow.
-
Define workflow states
Create new states or modify existing states and transitions that define the different stages in the workflow. A transition is always associated with an action of the same name. The rules and automations are defined in the action.
-
Configure actions
Set rules for Actions for each step in the workflow as necessary
Set conditions/rules for each step (e.g., 'If ticket category is IT') and define corresponding actions (e.g., 'Assign to IT team').
-
Configure automations
Choose one or more of the built-in automations and configure them to run when the action is triggered by a user on ChangeGear Web or from 3rd party application integrated with ChangeGear. You can set up notifications, make an organization-wide announcement, or send out a survey to customers, and more.
-
Manage approvals
For approval states (e.g., Pending Approval) edit the Approval Phase details, if needed, and select an Approval Group. You can also enable auto-approval.
See Approval Groups.
-
-
Save and implement the workflow
Save your workflow and implement it by assigning it to relevant processes or tickets.
Link: Enabling Workflows
See also:
Advanced Workflow Configurations